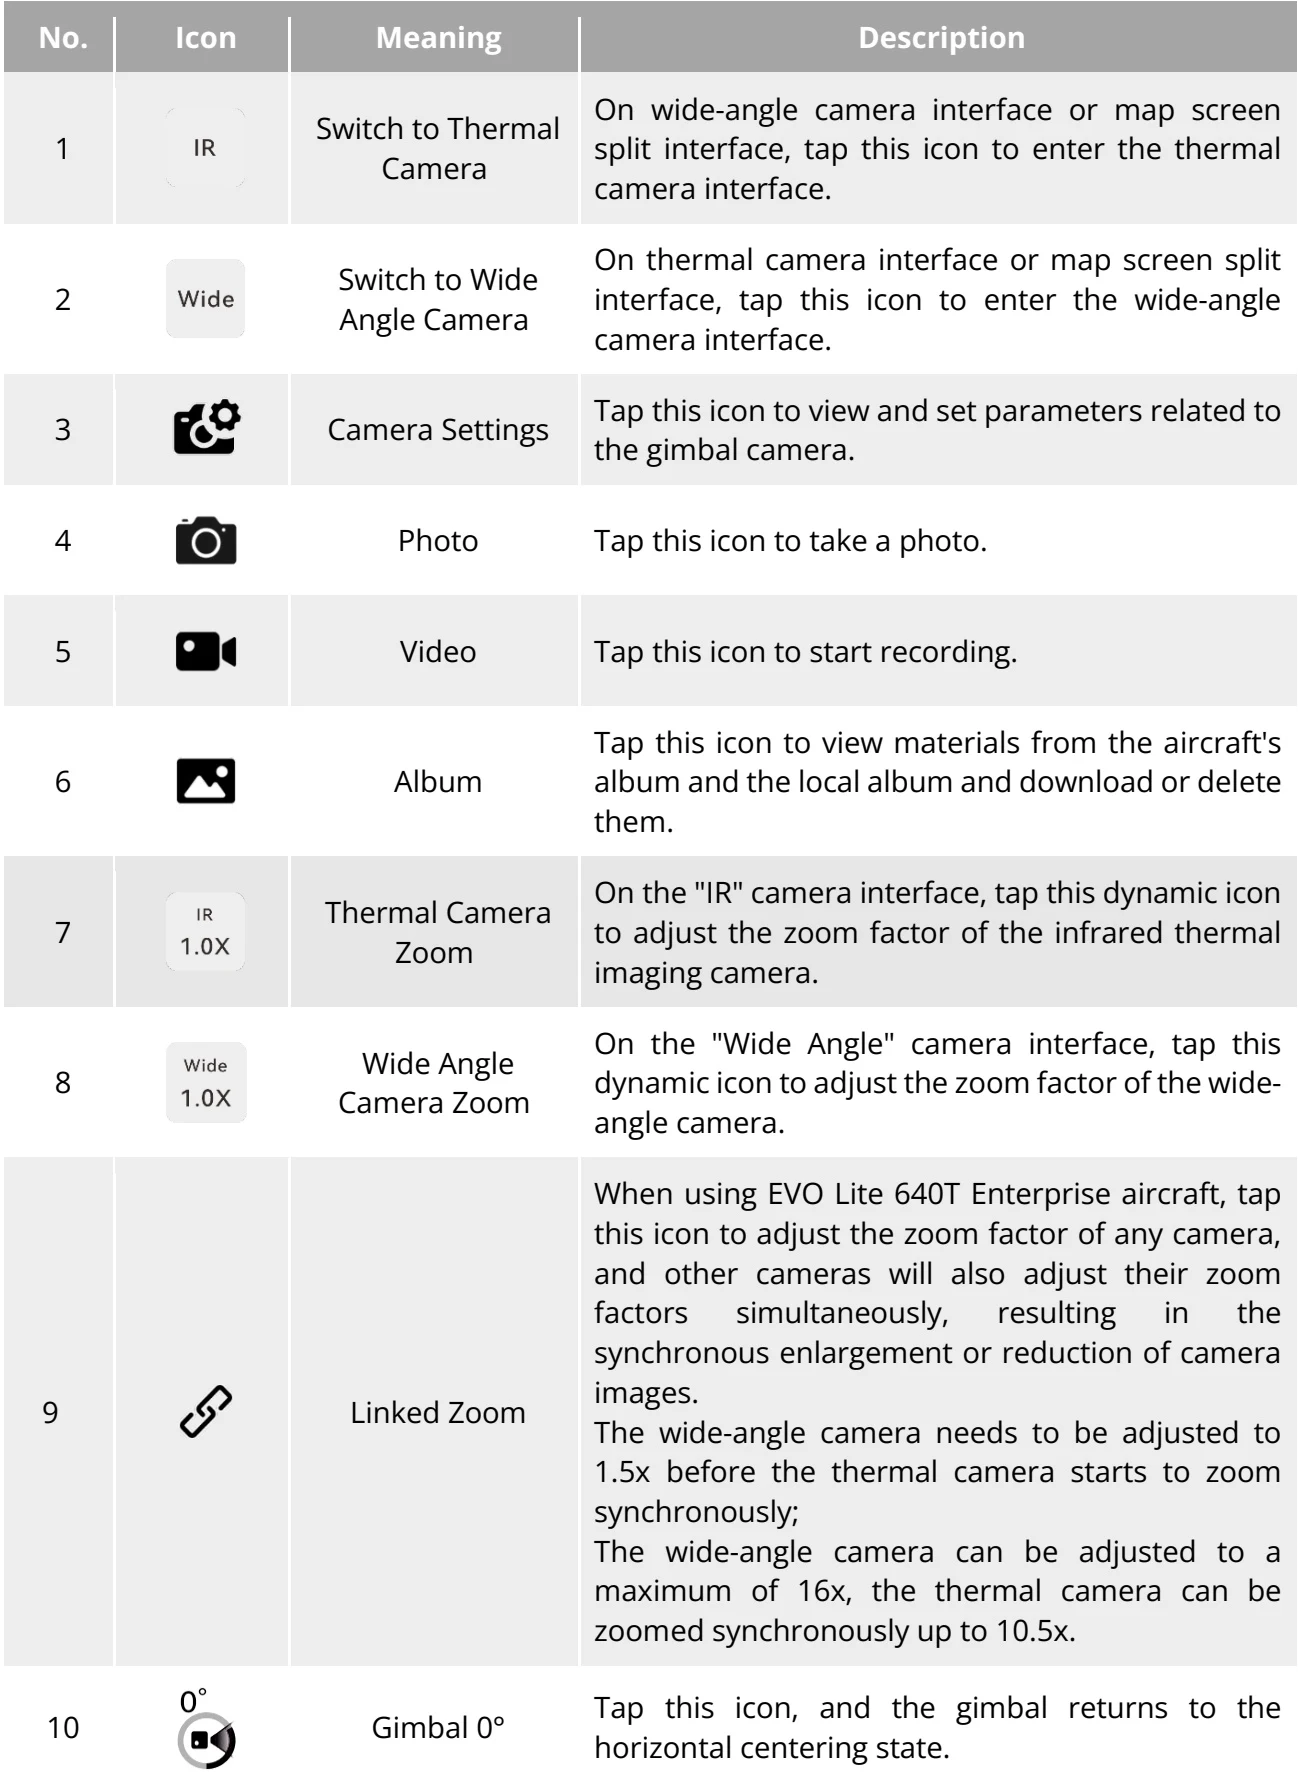
| No. | Icon | Meaning | Description |
| 1 | IR | Switch to Thermal Camera | On wide-angle camera interface or map screen split interface, tap this icon to enter the thermal camera interface. |
| 2 | Wide | Switch to Wide Angle Camera | On thermal camera interface or map screen split interface, tap this icon to enter the wide-angle camera interface. |
| 3 |  | Camera Settings | Tap this icon to view and set parameters related to the gimbal camera. |
| 4 |  | Photo | Tap this icon to take a photo. |
| 5 |  | Video | Tap this icon to start recording. |
| 6 | | Album | Tap this icon to view materials from the aircraft's album and the local album and download or delete them. |
| 7 | IR1.0X | Thermal Camera Zoom | On the "IR" camera interface, tap this dynamic icon to adjust the zoom factor of the infrared thermal imaging camera. |
| 8 | Wide1.0X | Wide Angle Camera Zoom | On the "Wide Angle" camera interface, tap this dynamic icon to adjust the zoom factor of the wide-angle camera. |
| 9 | | Linked Zoom | When using EVO Lite 640T Enterprise aircraft, tap this icon to adjust the zoom factor of any camera, and other cameras will also adjust their zoom factors simultaneously, resulting in the synchronous enlargement or reduction of camera images.The wide-angle camera needs to be adjusted to 1.5x before the thermal camera starts to zoom synchronously;The wide-angle camera can be adjusted to a maximum of 16x, the thermal camera can be zoomed synchronously up to 10.5x. |
| 10 | 0° | Gimbal 0° | Tap this icon, and the gimbal returns to the horizontal centering state. |
[PDF page 118, block 3](https://shop.skyflow.ca/learn/autel/evo-lite-enterprise/manuals/evo-lite-640t-v1-0-2/6-8-camera-interfaces#p118-b3)
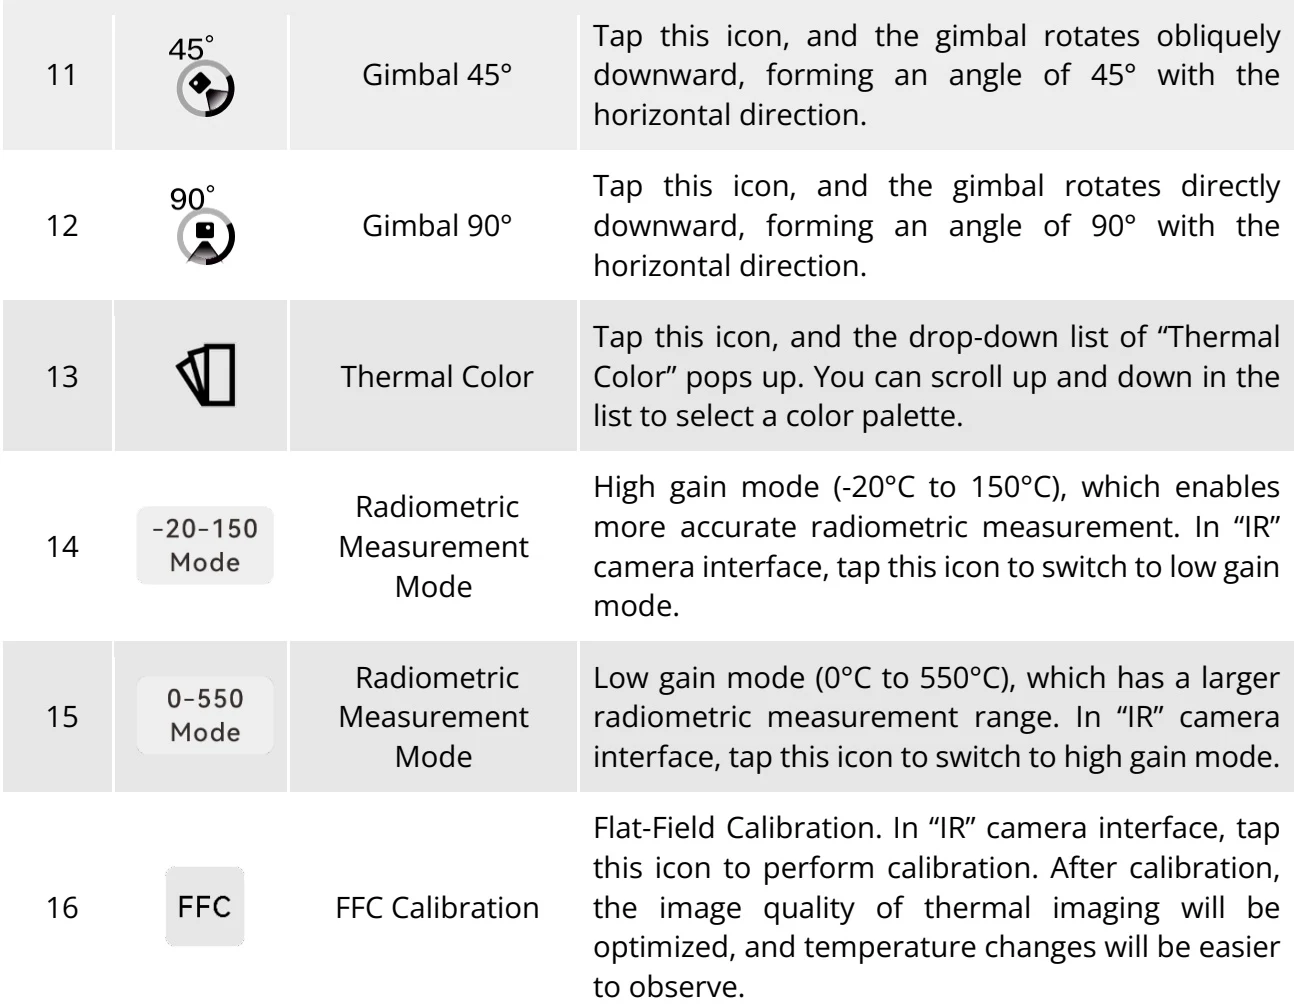
| 11 |  | Gimbal 45° | Tap this icon, and the gimbal rotates obliquely downward, forming an angle of 45° with the horizontal direction. |
| 12 |  | Gimbal 90° | Tap this icon, and the gimbal rotates directly downward, forming an angle of 90° with the horizontal direction. |
| 13 |  | Thermal Color | Tap this icon, and the drop-down list of “Thermal Color” pops up. You can scroll up and down in the list to select a color palette. |
| 14 | -20-150 Mode | Radiometric Measurement Mode | High gain mode (-20°C to 150°C), which enables more accurate radiometric measurement. In “IR” camera interface, tap this icon to switch to low gain mode. |
| 15 | 0-550 Mode | Radiometric Measurement Mode | Low gain mode (0°C to 550°C), which has a larger radiometric measurement range. In “IR” camera interface, tap this icon to switch to high gain mode. |
| 16 | FFC | FFC Calibration | Flat-Field Calibration. In “IR” camera interface, tap this icon to perform calibration. After calibration, the image quality of thermal imaging will be optimized, and temperature changes will be easier to observe. |
[PDF page 119, block 2](https://shop.skyflow.ca/learn/autel/evo-lite-enterprise/manuals/evo-lite-640t-v1-0-2/6-8-camera-interfaces#p119-b2)
On any camera interface, tap the illustrated icon to enter the "Camera Settings" interface. On the “Camera Settings” interface, you can perform the following operations:

[PDF page 119, block 3](https://shop.skyflow.ca/learn/autel/evo-lite-enterprise/manuals/evo-lite-640t-v1-0-2/6-8-camera-interfaces#p119-b3)
## View Photo Properties
[PDF page 119, block 4](https://shop.skyflow.ca/learn/autel/evo-lite-enterprise/manuals/evo-lite-640t-v1-0-2/6-8-camera-interfaces#p119-b4)
On the “Camera Settings” interface, tap the illustrated icon to view the size and format of wide-angle camera photos.

[PDF page 119, block 5](https://shop.skyflow.ca/learn/autel/evo-lite-enterprise/manuals/evo-lite-640t-v1-0-2/6-8-camera-interfaces#p119-b5)
## Set Video Properties
[PDF page 119, block 6](https://shop.skyflow.ca/learn/autel/evo-lite-enterprise/manuals/evo-lite-640t-v1-0-2/6-8-camera-interfaces#p119-b6)
On the “Camera Settings” interface, tap the illustrated icon to view the resolution, frame rate of the wide-angle camera videos, and to set the video encoding and format.

[PDF page 119, block 7](https://shop.skyflow.ca/learn/autel/evo-lite-enterprise/manuals/evo-lite-640t-v1-0-2/6-8-camera-interfaces#p119-b7)
Video encoding options are H.264 and H.265.
[PDF page 119, block 8](https://shop.skyflow.ca/learn/autel/evo-lite-enterprise/manuals/evo-lite-640t-v1-0-2/6-8-camera-interfaces#p119-b8)
Video format options are MOV and MP4.
[PDF page 119, block 9](https://shop.skyflow.ca/learn/autel/evo-lite-enterprise/manuals/evo-lite-640t-v1-0-2/6-8-camera-interfaces#p119-b9)
## Set Infrared Shooting
[PDF page 119, block 10](https://shop.skyflow.ca/learn/autel/evo-lite-enterprise/manuals/evo-lite-640t-v1-0-2/6-8-camera-interfaces#p119-b10)
On the “Camera Settings” interface, tap the illustrated icon to view the size and format of infrared photos or videos and set the image mode and radiometric measurement function.

[PDF page 119, block 11](https://shop.skyflow.ca/learn/autel/evo-lite-enterprise/manuals/evo-lite-640t-v1-0-2/6-8-camera-interfaces#p119-b11)
## Set Image Mode
[PDF page 119, block 12](https://shop.skyflow.ca/learn/autel/evo-lite-enterprise/manuals/evo-lite-640t-v1-0-2/6-8-camera-interfaces#p119-b12)
Two image modes are available, that is, “Manual” and “Auto”.
[PDF page 119, block 13](https://shop.skyflow.ca/learn/autel/evo-lite-enterprise/manuals/evo-lite-640t-v1-0-2/6-8-camera-interfaces#p119-b13)
If the “Manual” mode is set, you can adjust the "Contrast" and "Brightness".
[PDF page 119, block 14](https://shop.skyflow.ca/learn/autel/evo-lite-enterprise/manuals/evo-lite-640t-v1-0-2/6-8-camera-interfaces#p119-b14)
Turn On/Off Radiometric Measurement
[PDF page 119, block 15](https://shop.skyflow.ca/learn/autel/evo-lite-enterprise/manuals/evo-lite-640t-v1-0-2/6-8-camera-interfaces#p119-b15)
Tap the button to the right of "Radiometric Measurement" to turn on or off the radiometric measurement function.
[PDF page 119, block 16](https://shop.skyflow.ca/learn/autel/evo-lite-enterprise/manuals/evo-lite-640t-v1-0-2/6-8-camera-interfaces#p119-b16)
If this function is turned on, you can set the image enhancement, isotherm, emissivity, and temperature alarm.
[PDF page 119, block 17](https://shop.skyflow.ca/learn/autel/evo-lite-enterprise/manuals/evo-lite-640t-v1-0-2/6-8-camera-interfaces#p119-b17)
If this function is turned off, both "Radiometric Measurement Mode" and "FFC " cannot be set.
[PDF page 120, block 2](https://shop.skyflow.ca/learn/autel/evo-lite-enterprise/manuals/evo-lite-640t-v1-0-2/6-8-camera-interfaces#p120-b2)
## Advanced Settings
[PDF page 120, block 3](https://shop.skyflow.ca/learn/autel/evo-lite-enterprise/manuals/evo-lite-640t-v1-0-2/6-8-camera-interfaces#p120-b3)
On the “Camera Settings” interface, tap the illustrated icon to perform advanced settings for the camera:

[PDF page 120, block 4](https://shop.skyflow.ca/learn/autel/evo-lite-enterprise/manuals/evo-lite-640t-v1-0-2/6-8-camera-interfaces#p120-b4)
Select Camera
[PDF page 120, block 5](https://shop.skyflow.ca/learn/autel/evo-lite-enterprise/manuals/evo-lite-640t-v1-0-2/6-8-camera-interfaces#p120-b5)
You can select one or more camera lens. After a shooting lens is selected, when you tap the illustrated or illustrated icon, the selected lens will simultaneously take photos or record videos. For unselected lenses, the shooting function will be unavailable.

[PDF page 120, block 6](https://shop.skyflow.ca/learn/autel/evo-lite-enterprise/manuals/evo-lite-640t-v1-0-2/6-8-camera-interfaces#p120-b6)
## Set Grid
[PDF page 120, block 7](https://shop.skyflow.ca/learn/autel/evo-lite-enterprise/manuals/evo-lite-640t-v1-0-2/6-8-camera-interfaces#p120-b7)
Grid can assist with picture composition during shooting. You can select one or more grid styles.
[PDF page 120, block 8](https://shop.skyflow.ca/learn/autel/evo-lite-enterprise/manuals/evo-lite-640t-v1-0-2/6-8-camera-interfaces#p120-b8)
When multiple grid styles are selected, the grid styles will be superimposed and displayed on all camera interfaces.
[PDF page 120, block 9](https://shop.skyflow.ca/learn/autel/evo-lite-enterprise/manuals/evo-lite-640t-v1-0-2/6-8-camera-interfaces#p120-b9)
## Set Defog
[PDF page 120, block 10](https://shop.skyflow.ca/learn/autel/evo-lite-enterprise/manuals/evo-lite-640t-v1-0-2/6-8-camera-interfaces#p120-b10)
Defogging can make the shooting or recording scene more transparent and enhance color contrast and is used to eliminate the "fogging phenomenon" in the picture or the lack of picture clarity caused by smog.
[PDF page 120, block 11](https://shop.skyflow.ca/learn/autel/evo-lite-enterprise/manuals/evo-lite-640t-v1-0-2/6-8-camera-interfaces#p120-b11)
The stronger the defog intensity, the darker the image.
[PDF page 120, block 12](https://shop.skyflow.ca/learn/autel/evo-lite-enterprise/manuals/evo-lite-640t-v1-0-2/6-8-camera-interfaces#p120-b12)
Turn On/Off Stamps/Subtitles
[PDF page 120, block 13](https://shop.skyflow.ca/learn/autel/evo-lite-enterprise/manuals/evo-lite-640t-v1-0-2/6-8-camera-interfaces#p120-b13)
Once this function is enabled, the shot images will include the set stamp.
[PDF page 120, block 14](https://shop.skyflow.ca/learn/autel/evo-lite-enterprise/manuals/evo-lite-640t-v1-0-2/6-8-camera-interfaces#p120-b14)
Turn On/Off Pre-recording
[PDF page 120, block 15](https://shop.skyflow.ca/learn/autel/evo-lite-enterprise/manuals/evo-lite-640t-v1-0-2/6-8-camera-interfaces#p120-b15)
If this function is turned on, the aircraft will start recording 15 seconds in advance (tap the illustrated icon).

[PDF page 120, block 16](https://shop.skyflow.ca/learn/autel/evo-lite-enterprise/manuals/evo-lite-640t-v1-0-2/6-8-camera-interfaces#p120-b16)
## Tip
[PDF page 120, block 17](https://shop.skyflow.ca/learn/autel/evo-lite-enterprise/manuals/evo-lite-640t-v1-0-2/6-8-camera-interfaces#p120-b17)
The pre-recording function can prevent missing important shots when the aircraft is flying rapidly. The pre-recorded videos will be saved in the "PreRccorder" folder in the remote controller's root directory.
[PDF page 120, block 18](https://shop.skyflow.ca/learn/autel/evo-lite-enterprise/manuals/evo-lite-640t-v1-0-2/6-8-camera-interfaces#p120-b18)
## Turn On/Off Histogram
[PDF page 120, block 19](https://shop.skyflow.ca/learn/autel/evo-lite-enterprise/manuals/evo-lite-640t-v1-0-2/6-8-camera-interfaces#p120-b19)
The histogram can display the distribution of pixels in the images captured by the camera, thereby reflecting the exposure of the images.
[PDF page 120, block 20](https://shop.skyflow.ca/learn/autel/evo-lite-enterprise/manuals/evo-lite-640t-v1-0-2/6-8-camera-interfaces#p120-b20)
1. If the histogram function is turned on, a floating "Histogram" window will be generated on the screen of the remote controller, and you can drag the "Histogram" window to any area on the screen. Tap the "Close" button in the upper-right corner of the window to turn off the histogram function.
[PDF page 120, block 21](https://shop.skyflow.ca/learn/autel/evo-lite-enterprise/manuals/evo-lite-640t-v1-0-2/6-8-camera-interfaces#p120-b21)
Set Storage Location
[PDF page 120, block 22](https://shop.skyflow.ca/learn/autel/evo-lite-enterprise/manuals/evo-lite-640t-v1-0-2/6-8-camera-interfaces#p120-b22)
You can choose "SD Card" or "Internal Storage" as the storage location. Also, you can format the corresponding storage location.
[PDF page 120, block 23](https://shop.skyflow.ca/learn/autel/evo-lite-enterprise/manuals/evo-lite-640t-v1-0-2/6-8-camera-interfaces#p120-b23)
Reset Camera Parameters
[PDF page 120, block 24](https://shop.skyflow.ca/learn/autel/evo-lite-enterprise/manuals/evo-lite-640t-v1-0-2/6-8-camera-interfaces#p120-b24)
Restore the camera parameters to default settings.
[PDF page 120, block 25](https://shop.skyflow.ca/learn/autel/evo-lite-enterprise/manuals/evo-lite-640t-v1-0-2/6-8-camera-interfaces#p120-b25)
View Camera Model
[PDF page 120, block 26](https://shop.skyflow.ca/learn/autel/evo-lite-enterprise/manuals/evo-lite-640t-v1-0-2/6-8-camera-interfaces#p120-b26)
View the gimbal camera model.
[PDF page 120, block 27](https://shop.skyflow.ca/learn/autel/evo-lite-enterprise/manuals/evo-lite-640t-v1-0-2/6-8-camera-interfaces#p120-b27)
## 6.8.2 Camera Switch and Operation
[PDF page 121, block 2](https://shop.skyflow.ca/learn/autel/evo-lite-enterprise/manuals/evo-lite-640t-v1-0-2/6-8-camera-interfaces#p121-b2)
## Camera Switch
[PDF page 121, block 3](https://shop.skyflow.ca/learn/autel/evo-lite-enterprise/manuals/evo-lite-640t-v1-0-2/6-8-camera-interfaces#p121-b3)
In the flight application, tap the illustrated icon in the corner of the "IR” Camera interface, or tap the illustrated icon after entering the “Wide Angle” camera interface, to enter the "IR" full-screen interface.

[PDF page 121, block 4](https://shop.skyflow.ca/learn/autel/evo-lite-enterprise/manuals/evo-lite-640t-v1-0-2/6-8-camera-interfaces#p121-b4)
In the flight application, tap the illustrated icon in the corner of the "Wide Angle" Camera interface, or tap the illustrated icon after entering the "IR" camera interface, to enter the "Wide Angle" Camera full-screen interface.

[PDF page 121, block 5](https://shop.skyflow.ca/learn/autel/evo-lite-enterprise/manuals/evo-lite-640t-v1-0-2/6-8-camera-interfaces#p121-b5)
## Tip
[PDF page 121, block 6](https://shop.skyflow.ca/learn/autel/evo-lite-enterprise/manuals/evo-lite-640t-v1-0-2/6-8-camera-interfaces#p121-b6)
EVO Lite 6K Enterprise aircraft can display the “Wide Angle” Camera interface after connecting to the remote controller.
[PDF page 121, block 7](https://shop.skyflow.ca/learn/autel/evo-lite-enterprise/manuals/evo-lite-640t-v1-0-2/6-8-camera-interfaces#p121-b7)
EVO Lite 640T Enterprise aircraft can display the “Wide Angle” Camera interface and “IR” camera interface after connecting to the remote controller.
[PDF page 121, block 8](https://shop.skyflow.ca/learn/autel/evo-lite-enterprise/manuals/evo-lite-640t-v1-0-2/6-8-camera-interfaces#p121-b8)
## “Wide Angle Camera” Operations
[PDF page 121, block 9](https://shop.skyflow.ca/learn/autel/evo-lite-enterprise/manuals/evo-lite-640t-v1-0-2/6-8-camera-interfaces#p121-b9)
## 1. Adjust the Wide Angle Zoom Factor
[PDF page 121, block 10](https://shop.skyflow.ca/learn/autel/evo-lite-enterprise/manuals/evo-lite-640t-v1-0-2/6-8-camera-interfaces#p121-b10)
While shooting, tap the illustrated dynamic icon, and the wide angle zoom factor setting window will pop up. A maximum of 16x digital zoom is supported. You can drag up or down to zoom in or out on the picture captured by the wide angle camera, so as to flexibly shoot objects at different distances.

[PDF page 121, block 11](https://shop.skyflow.ca/learn/autel/evo-lite-enterprise/manuals/evo-lite-640t-v1-0-2/6-8-camera-interfaces#p121-b11)
## 2. Camera Settings
[PDF page 121, block 12](https://shop.skyflow.ca/learn/autel/evo-lite-enterprise/manuals/evo-lite-640t-v1-0-2/6-8-camera-interfaces#p121-b12)
Tap the illustrated icon to enter the "Camera Settings" interface and perform relevant settings. For more information, see “6.8.1 Camera Function Access” in this chapter.

[PDF page 121, block 13](https://shop.skyflow.ca/learn/autel/evo-lite-enterprise/manuals/evo-lite-640t-v1-0-2/6-8-camera-interfaces#p121-b13)
## Tip
[PDF page 121, block 14](https://shop.skyflow.ca/learn/autel/evo-lite-enterprise/manuals/evo-lite-640t-v1-0-2/6-8-camera-interfaces#p121-b14)
When the “Wide Angle” camera photo size is set as “12M”, up to 16 x digital zoom is supported; when it is set as “48M”, up to 8 x digital zoom is supported.
[PDF page 121, block 15](https://shop.skyflow.ca/learn/autel/evo-lite-enterprise/manuals/evo-lite-640t-v1-0-2/6-8-camera-interfaces#p121-b15)
## “Thermal Camera” Operations
[PDF page 121, block 16](https://shop.skyflow.ca/learn/autel/evo-lite-enterprise/manuals/evo-lite-640t-v1-0-2/6-8-camera-interfaces#p121-b16)
## 1. Set Thermal Color
[PDF page 121, block 17](https://shop.skyflow.ca/learn/autel/evo-lite-enterprise/manuals/evo-lite-640t-v1-0-2/6-8-camera-interfaces#p121-b17)
After tapping the illustrated icon, you can scroll up and down in the pop-up drop-down list to select a color palette.

[PDF page 121, block 18](https://shop.skyflow.ca/learn/autel/evo-lite-enterprise/manuals/evo-lite-640t-v1-0-2/6-8-camera-interfaces#p121-b18)
After selection, the images from the thermal camera will be displayed in the color style of the selected color palette.
[PDF page 121, block 19](https://shop.skyflow.ca/learn/autel/evo-lite-enterprise/manuals/evo-lite-640t-v1-0-2/6-8-camera-interfaces#p121-b19)
## 2. Set Infrared Shooting
[PDF page 121, block 20](https://shop.skyflow.ca/learn/autel/evo-lite-enterprise/manuals/evo-lite-640t-v1-0-2/6-8-camera-interfaces#p121-b20)
Tap the illustrated icon to enter the "Camera Settings" interface and perform relevant settings. For more information, see “6.8.1 Camera Function Access” in this chapter.

[PDF page 121, block 21](https://shop.skyflow.ca/learn/autel/evo-lite-enterprise/manuals/evo-lite-640t-v1-0-2/6-8-camera-interfaces#p121-b21)
## 3. Set Radiometric Measurement Mode
[PDF page 121, block 22](https://shop.skyflow.ca/learn/autel/evo-lite-enterprise/manuals/evo-lite-640t-v1-0-2/6-8-camera-interfaces#p121-b22)
Tap the " icon or the " 0-5050 " icon to switch between radiometric measurement modes.
[PDF page 121, block 23](https://shop.skyflow.ca/learn/autel/evo-lite-enterprise/manuals/evo-lite-640t-v1-0-2/6-8-camera-interfaces#p121-b23)
High gain mode (-20°C to 150°C): This mode has higher radiometric measurement accuracy but a smaller radiometric measurement range compared with the low gain mode.
[PDF page 121, block 24](https://shop.skyflow.ca/learn/autel/evo-lite-enterprise/manuals/evo-lite-640t-v1-0-2/6-8-camera-interfaces#p121-b24)
Low gain mode ( 0 ^ { \circ } \mathsf { C } to 5 5 0 ^ { \circ } \mathsf { C } ) { \mathrm { : } } : This mode has a larger radiometric measurement range but lower radiometric measurement accuracy compared with the high gain mode.
[PDF page 122, block 2](https://shop.skyflow.ca/learn/autel/evo-lite-enterprise/manuals/evo-lite-640t-v1-0-2/6-8-camera-interfaces#p122-b2)
## 4. FFC Calibration
[PDF page 122, block 3](https://shop.skyflow.ca/learn/autel/evo-lite-enterprise/manuals/evo-lite-640t-v1-0-2/6-8-camera-interfaces#p122-b3)
Tap the illustrated icon to enable the FFC calibration function.

[PDF page 122, block 4](https://shop.skyflow.ca/learn/autel/evo-lite-enterprise/manuals/evo-lite-640t-v1-0-2/6-8-camera-interfaces#p122-b4)
## 5. Adjust the Infrared Zoom Factor
[PDF page 122, block 5](https://shop.skyflow.ca/learn/autel/evo-lite-enterprise/manuals/evo-lite-640t-v1-0-2/6-8-camera-interfaces#p122-b5)
While shooting, tap the illustrated dynamic icon, and the infrared zoom factor setting window will pop up. You can drag up or down to zoom in or out on the picture captured by the thermal camera, so as to flexibly shoot objects at different distances.

[PDF page 122, block 6](https://shop.skyflow.ca/learn/autel/evo-lite-enterprise/manuals/evo-lite-640t-v1-0-2/6-8-camera-interfaces#p122-b6)
## Tip
[PDF page 122, block 7](https://shop.skyflow.ca/learn/autel/evo-lite-enterprise/manuals/evo-lite-640t-v1-0-2/6-8-camera-interfaces#p122-b7)
The radiometric measurement mode and FFC calibration functions can be used only after the infrared radiometric measurement function is enabled in the camera settings.
[PDF page 122, block 8](https://shop.skyflow.ca/learn/autel/evo-lite-enterprise/manuals/evo-lite-640t-v1-0-2/6-8-camera-interfaces#p122-b8)
The IR camera of EVO Lite 640T Enterprise gimbal supports up to 16x digital zoom.
[PDF page 122, block 9](https://shop.skyflow.ca/learn/autel/evo-lite-enterprise/manuals/evo-lite-640t-v1-0-2/6-8-camera-interfaces#p122-b9)
## Warning
[PDF page 122, block 10](https://shop.skyflow.ca/learn/autel/evo-lite-enterprise/manuals/evo-lite-640t-v1-0-2/6-8-camera-interfaces#p122-b10)
While shooting, do not aim the infrared thermal imaging camera at strong energy sources such as the sun, lava, laser beams, and molten metal, to avoid damaging the infrared detector.
[PDF page 122, block 11](https://shop.skyflow.ca/learn/autel/evo-lite-enterprise/manuals/evo-lite-640t-v1-0-2/6-8-camera-interfaces#p122-b11)
The temperature of the measured target should be within 600°C. Over-temperature measurements can cause burns and damage to the infrared detector.
[PDF page 122, block 12](https://shop.skyflow.ca/learn/autel/evo-lite-enterprise/manuals/evo-lite-640t-v1-0-2/6-8-camera-interfaces#p122-b12)