
Watch the complete tutorial
Camera controls at a glance
| Task | Control | Options shown |
|---|---|---|
| Select split-screen preset | Hold R3 | R1 / R2 / R3 preset selection |
| Toggle display | Press R3 | Single view / multi-view |
| Night Scene activation | Night Scene Mode | Auto / On / Off |
| Low-light settings | Moon icon | Auto / Low (20fps) / High (5fps) |
| Thermal-visible fusion | Fusion → Visible-Light Image Fusion | Disable / PIP / Overlay |
| Fusion appearance | Fusion Enhancement | Edge Enhancement / Heat Source Overlay |
Select a split-screen preset with R3
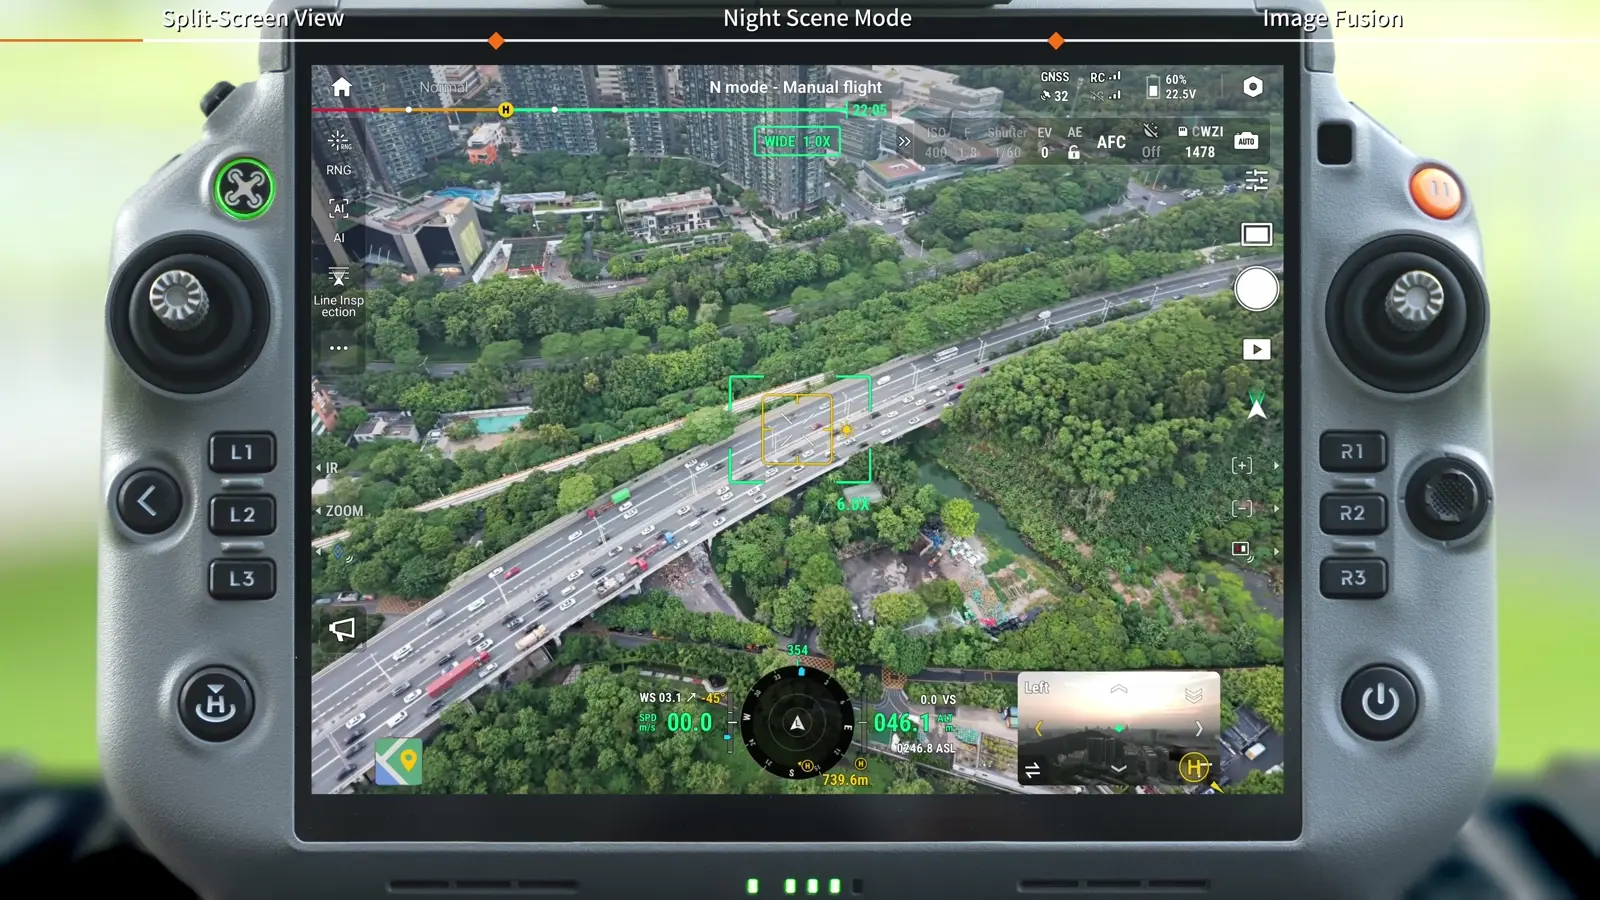
A paired display keeps two useful views available at once. For example, a wider view can retain scene context while a closer view supports identification. Choose the combination around the question you are answering rather than filling the screen with every available feed.
- Enter the camera view in DJI Pilot 2.
- Press and hold R3 beside the screen to open the split-screen selection.
- Use R1, R2 or R3 to select the corresponding preset.
Build your own side-by-side combinations
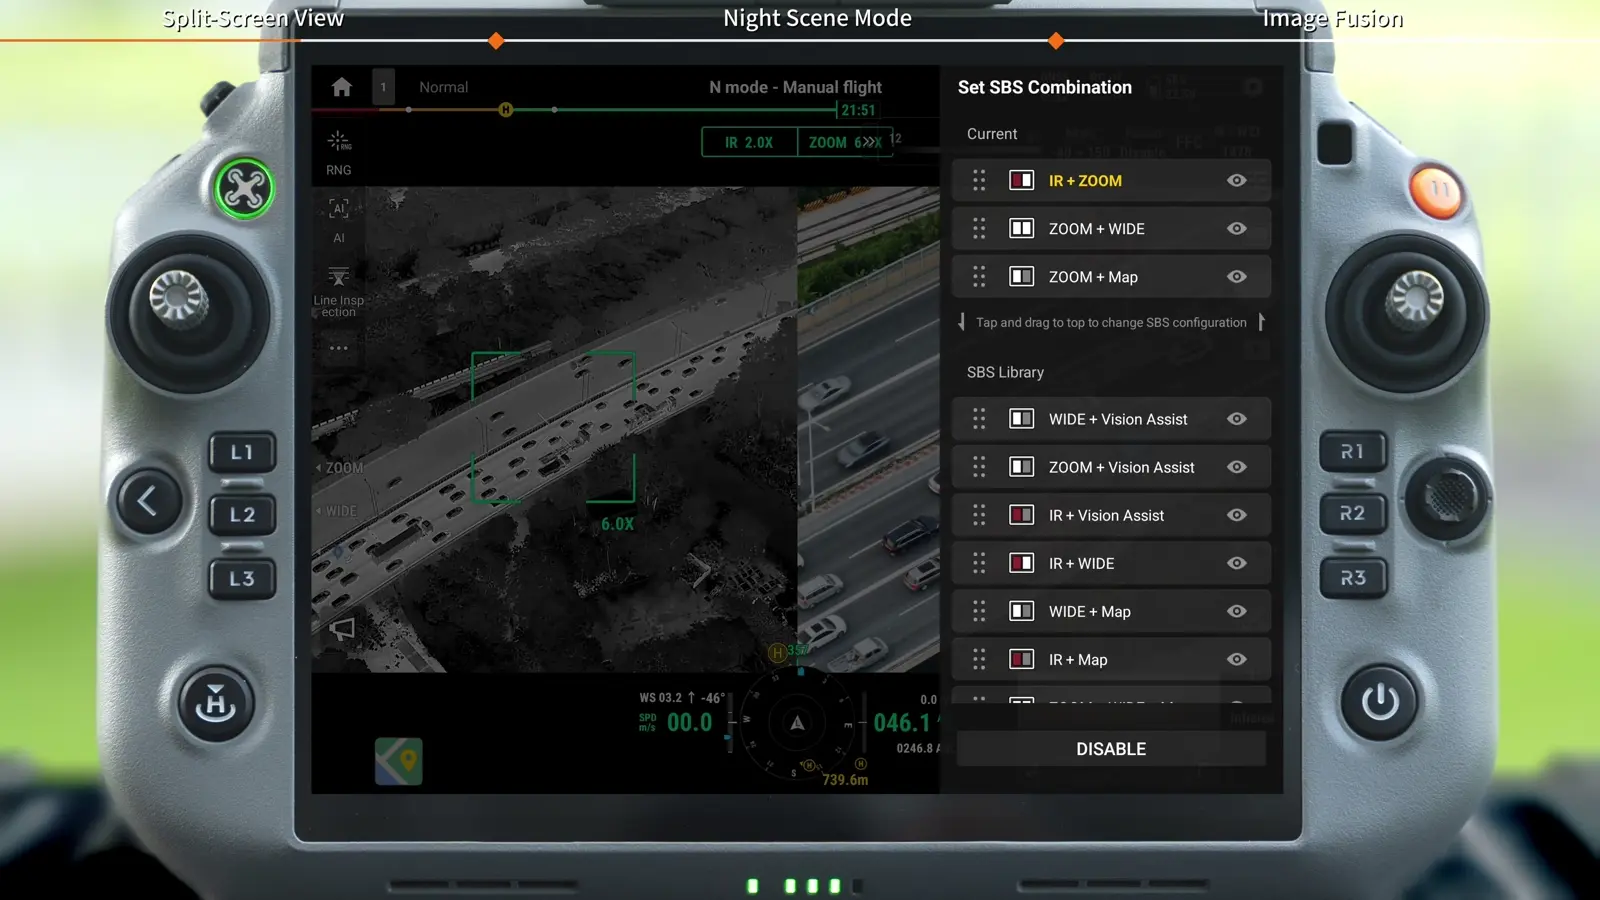
The SBS Library supplies the layouts you can place in the preset area. Arrange the combinations your crew uses repeatedly so switching views during a mission follows a familiar pattern.
- Open More SBS Combinations, then Set SBS Combination.
- Choose a combination from the SBS Library.
- Press, hold and drag it into the area above the library.
- Tap Close to apply the arrangement.
Switch between a single view and multiple views
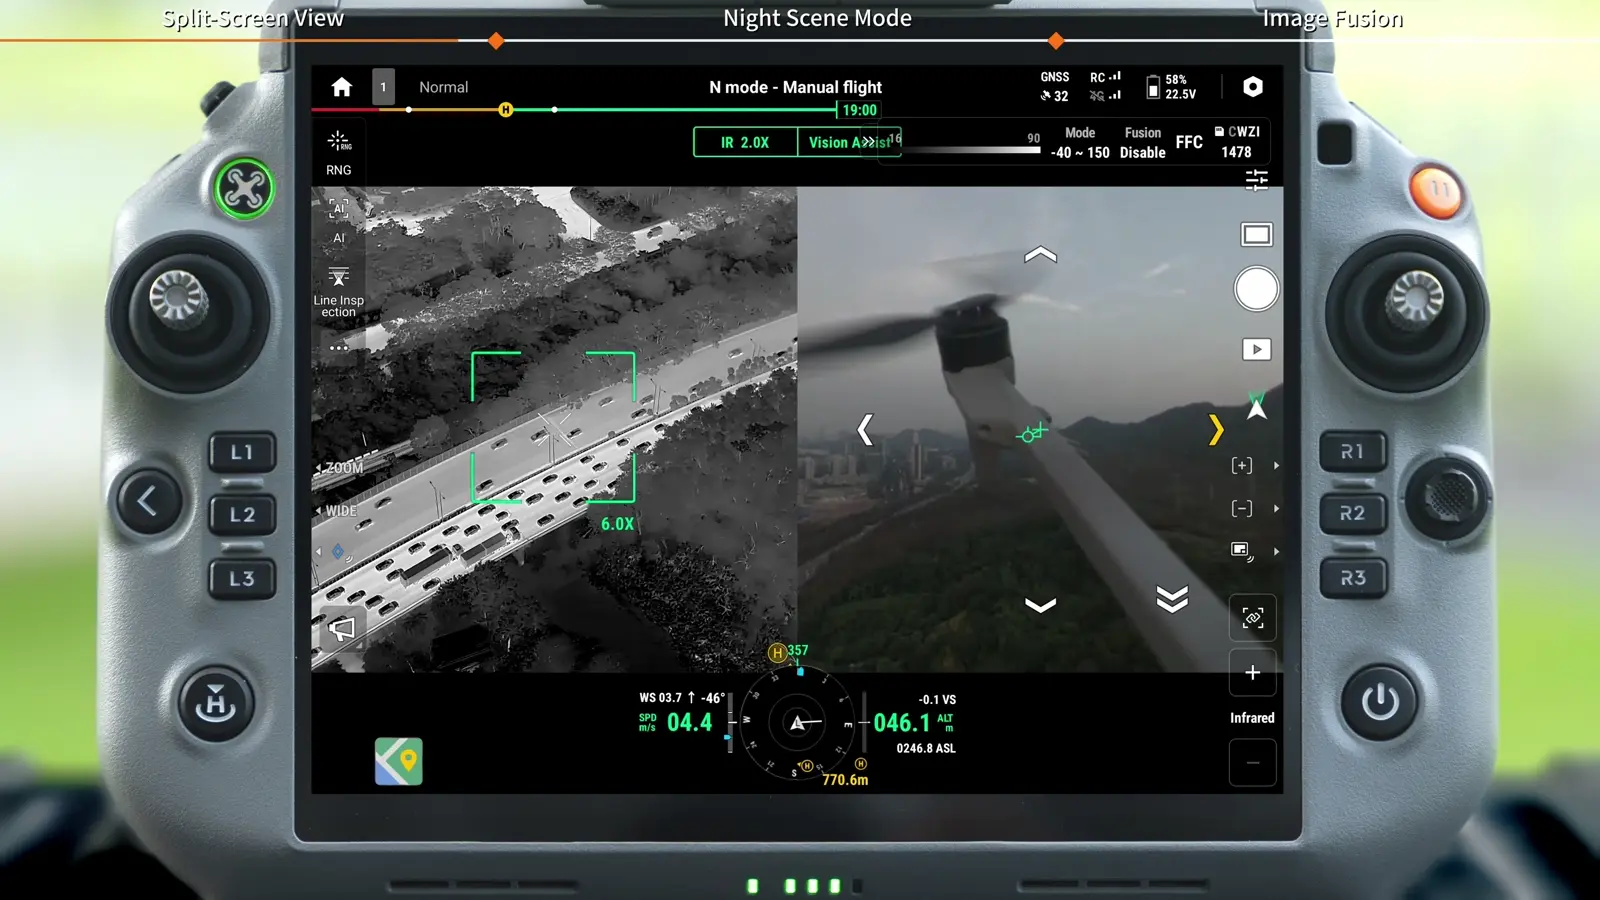
Once a split-screen layout is active, a short press of R3 toggles between single-view and multi-view displays. The distinction between a short press and a press-and-hold matters: one changes the display state, while the other opens preset selection.
Use the multi-view display to orient yourself, then the single view when you need more display area for a specific detail. Return to the paired view to reconnect that detail with the surrounding scene.
Enable Night Scene and choose its level
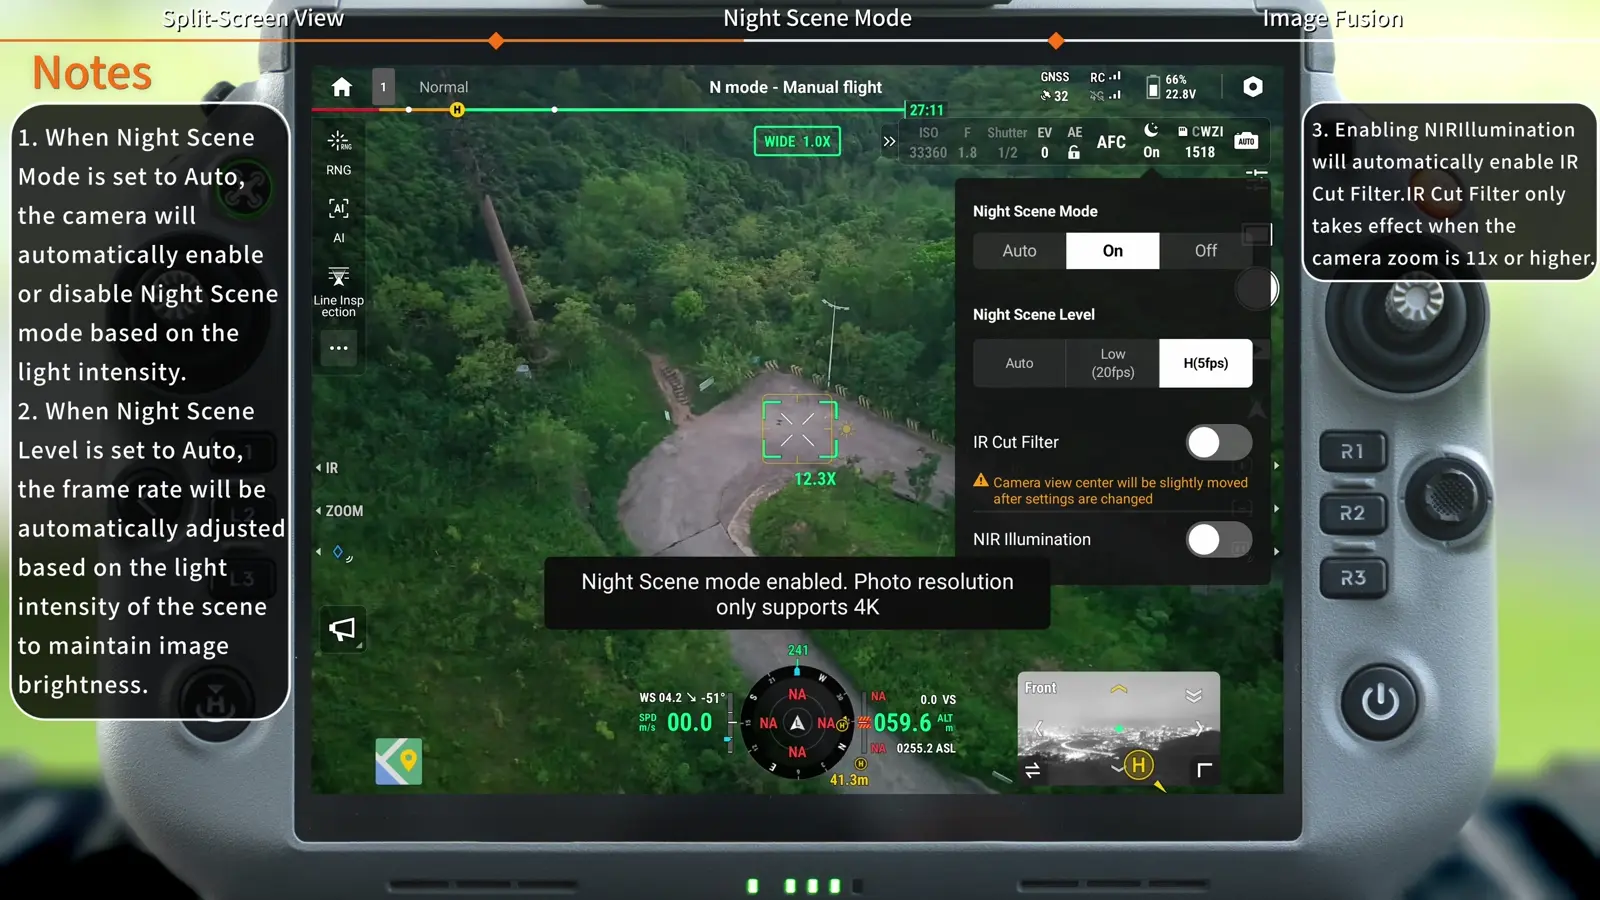
Tap the moon icon at the upper right of the camera view to open Night Scene settings and enable the feature. The levels shown are Auto, Low (20fps) and High (5fps). The frame-rate labels are important when comparing a moving scene: a five-frame-per-second image updates less often than a twenty-frame-per-second image.
Night Scene Mode and Night Scene Level are separate settings. Mode offers Auto, On and Off; Auto switches Night Scene on or off with ambient light. Level Auto adjusts the frame rate with scene brightness. Enabling NIR Illumination also enables IR Cut Filter, which takes effect at 11× camera zoom and above.
- Open the moon-icon Night Scene menu.
- Enable Night Scene and choose Auto, Low (20fps) or High (5fps).
- Compare the subject detail and displayed motion before settling on a level.
- Adjust IR Cut Filter and NIR Illumination as needed in the demonstrated controls.
Open visible-light fusion in the thermal camera
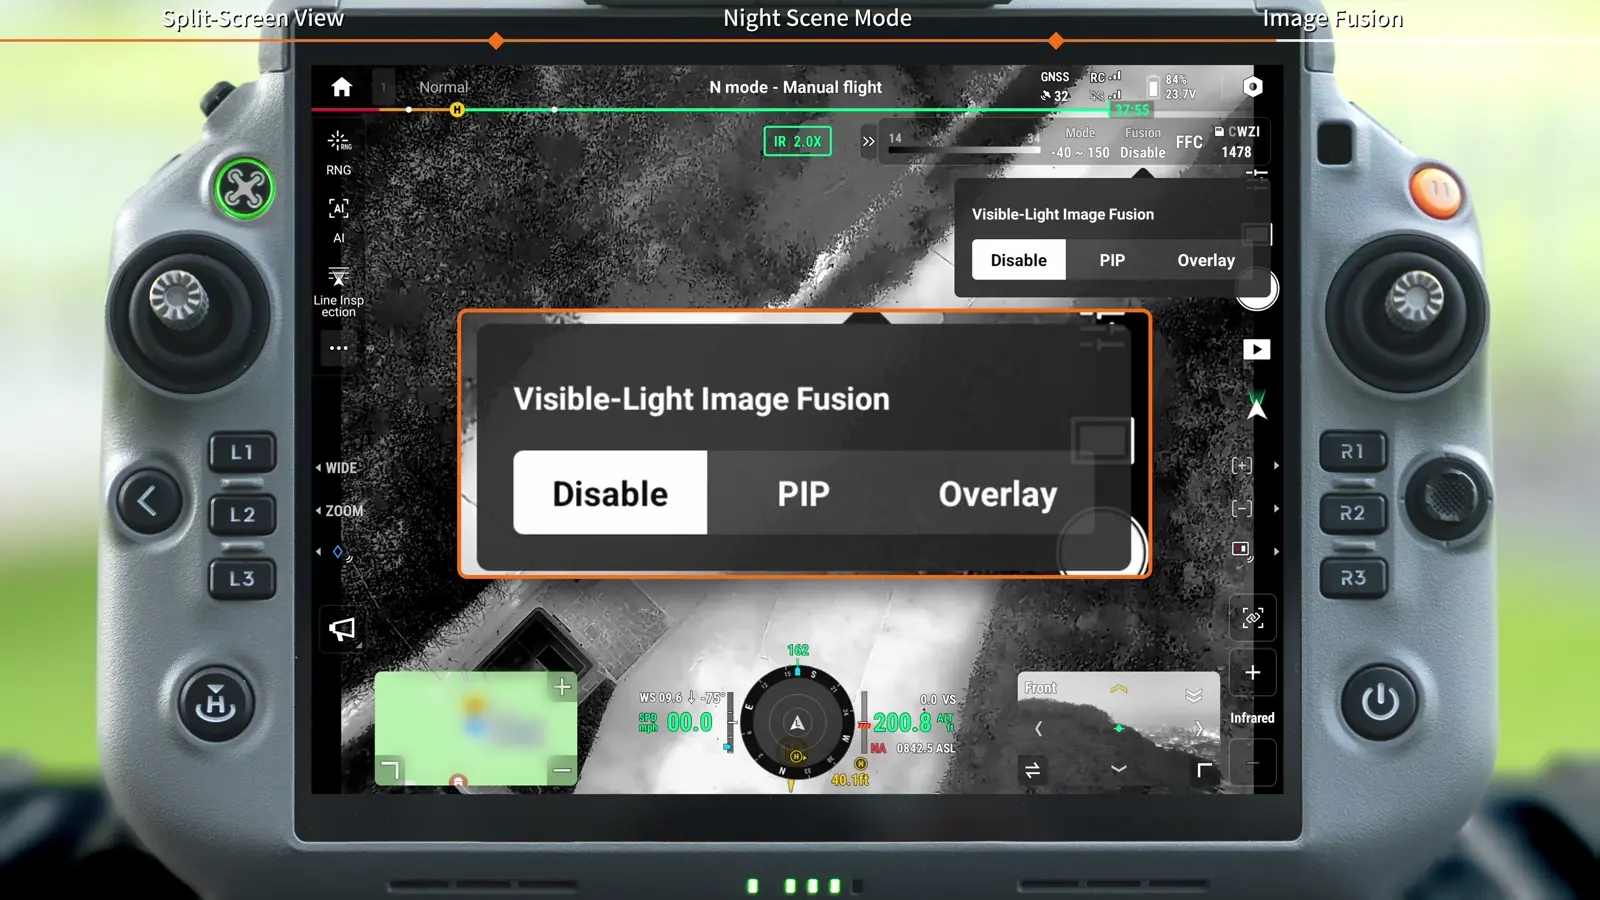
Fusion combines the thermal view with visible-light information so a heat pattern can be related to physical detail. Start by identifying the thermal feature, then use the visible contribution to understand where it sits on the subject.
- Switch to the thermal camera.
- Tap Fusion at the upper right.
- Open Visible-Light Image Fusion.
- Choose Disable, PIP or Overlay.
Tune PIP and overlay enhancement
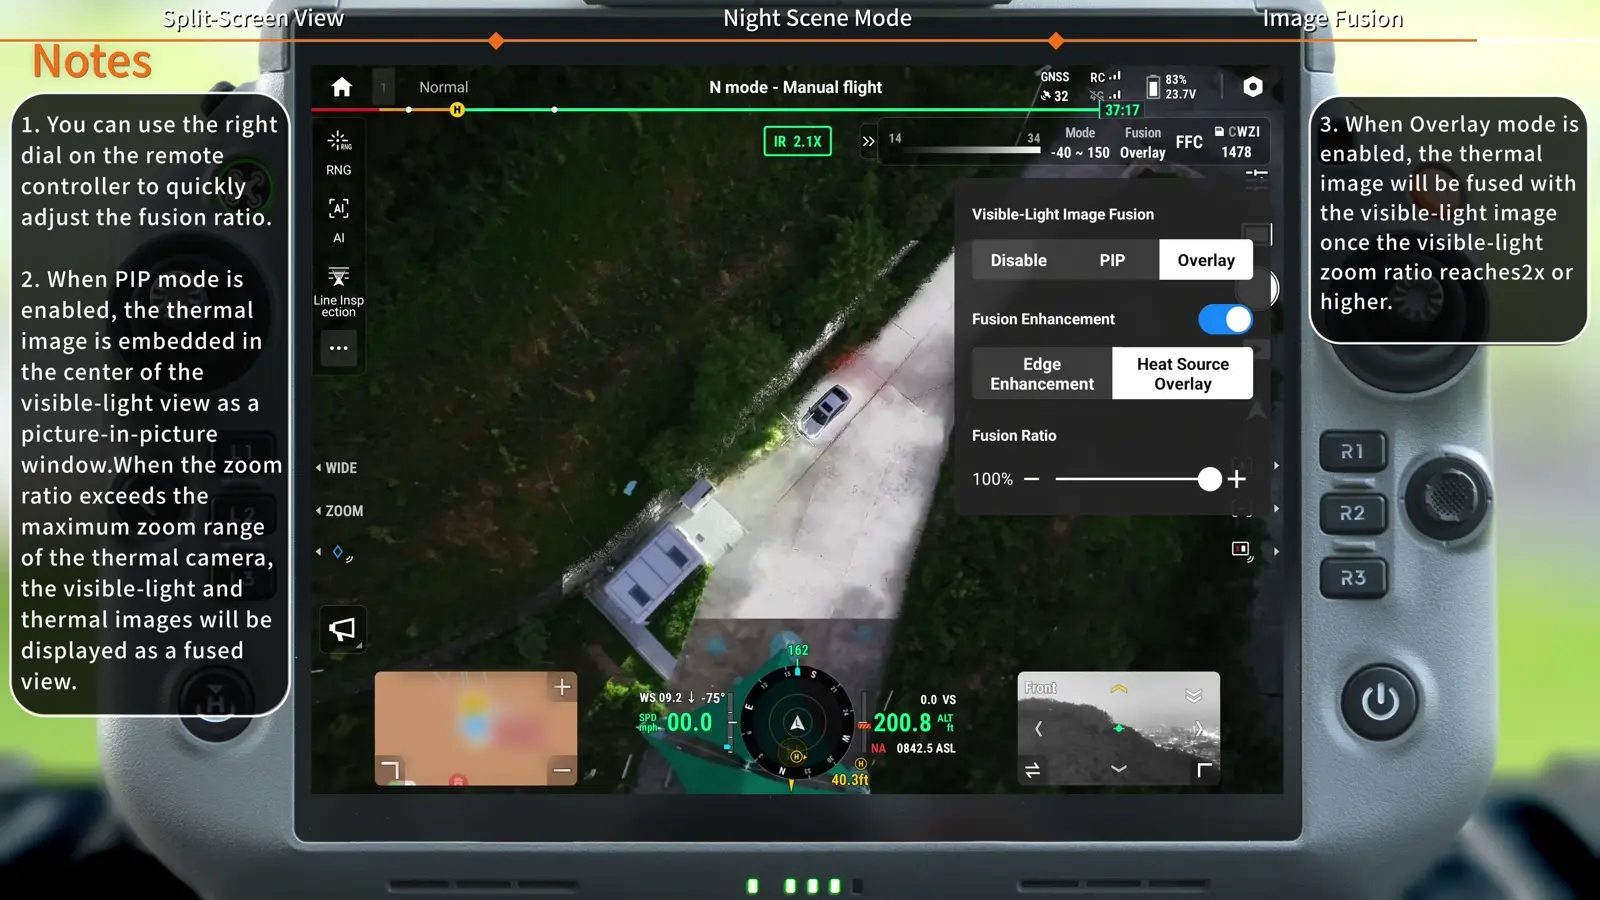
Both the picture-in-picture and overlay workflows offer Fusion Enhancement. The demonstrated choices are Edge Enhancement and Heat Source Overlay, with a slider for the fusion ratio. The ratio changes the presentation of the combined image; it is a display choice to evaluate against the scene.
The right controller dial also provides quick fusion-ratio adjustment. In PIP, the thermal image sits in the centre of the visible view; beyond the thermal camera’s maximum zoom range, the images are shown as a fused view. In Overlay, fusion begins when visible-light zoom reaches 2× or higher, as the on-screen notes explain.
- Choose PIP or Overlay.
- Open Fusion Enhancement and compare Edge Enhancement with Heat Source Overlay.
- Adjust the fusion-ratio slider while watching a recognizable feature.
- Retain enough visual context to identify the feature and enough thermal detail to explain the observation.
Create a repeatable inspection sequence
SkyFlow's suggested practice sequence is to frame a recognizable subject, establish its wider context, inspect the area of interest and then compare the fused and thermal views. Save observations in a sequence that another team member can follow without having watched the flight.
For a crew handover, record the chosen split-screen presets and Night Scene level alongside the imaging task. This makes the next session easier to reproduce and separates a deliberate camera setup from an accidental display state.
Your session checklist
Use these points to review the workflow with your crew.
- R3 short press and press-and-hold distinguished
- SBS presets arranged for the task
- Night Scene level compared on the actual scene
- IR filter and NIR illumination controls located
- PIP and overlay compared
- Fusion enhancement and ratio reviewed
Questions & answers
How do I open split-screen options on Matrice 5T?
Press and hold R3 in the DJI Pilot 2 camera view. R1, R2 and R3 select the corresponding preset. A short press of R3 toggles single-view and multi-view displays once split-screen is active.
What Night Scene levels does the tutorial show?
The levels are Auto, Low (20fps) and High (5fps). Open the moon icon at the upper right of the camera view to access the settings.
What thermal fusion modes are available?
Visible-Light Image Fusion offers Disable, PIP and Overlay. The PIP and Overlay workflows include Edge Enhancement or Heat Source Overlay and a fusion-ratio slider.
What is the difference between Night Scene Mode and Night Scene Level?
Mode controls activation with Auto, On and Off. Level controls the low-light imaging setting with Auto, Low (20fps) and High (5fps). Level Auto adjusts frame rate with scene brightness.
Video transcript
Read the complete transcript
Welcome to our tutorial video for DJI Matrice 5T
where we will introduce you to the new camera features
The split-screen feature divides the remote controller screen into multiple independent display areas
so that one screen can serve multiple purposes
Simply select a preset split-screen combination
and the system will automatically arrange the views in the corresponding positions
In the camera view of DJI Pilot 2
press and hold the R3 button beside the screen to open the split-screen mode selection page
Press the R1, R2
or R3 button on the side as needed to enter the corresponding split-screen mode
If these do not meet your needs
tap "More SBS Combinations" to enter the "Set SBS Combination" page
Select the split-screen mode you need from the "SBS Library" window
then press and hold it and drag it above the SBS Library to complete the configuration
Tap "Close" to apply the change
In split-screen mode
press the R3 button to switch between single-view and multi-split-screen modes
In low-light conditions at night
tap the moon icon in the upper right corner to enter the Night Scene Mode settings
and enable "Night Scene Mode"
This overcomes low-light limitations at night and makes the subject clearer
Night Scene Level offers three noise reduction levels
Auto, Low (20fps), and High (5fps).
You can enable IR Cut Filter
and NIR Illumination as needed
The fusion feature overlays the visible-light image with the infrared thermal image
Dual-light fusion lets you see clear scene details while intuitively displaying the temperature distribution
In thermal camera mode
tap the "Fusion" icon in the upper right corner to enter the "Visible-Light Image Fusion" settings
Visible-Light Image Fusion offers three modes
Disable, PIP (picture-in-picture), and Overlay
Select "PIP" mode and enable "Fusion Enhancement"
You can choose "Edge Enhancement" or "Heat Source Overlay"
and drag the slider to adjust the fusion ratio
Select "Overlay" mode and enable "Fusion Enhancement"
You can choose "Edge Enhancement" or "Heat Source Overlay"
and drag the slider to adjust the fusion ratio
Thank you for watching