Please use a smart battery within the appropriate temperature range (-10℃ ~ +40℃). Using it in too high or low temperatures will affect the battery’s safety and lifespan and may cause spontaneous battery combustion or permanent damage to the battery. PDF p. 91
Do not use the aircraft in a strong electrostatic (such as thunderstorms) or electromagnetic environment. Otherwise, some functions of the smart battery may fail (e.g., abnormal battery output and power failure), resulting in serious aircraft malfunctions. PDF p. 91
Do not use a smart battery that has ever been dropped from the aircraft or subjected to external impacts. PDF p. 91
Do not use a water-soaked smart battery or immerse a smart battery in water or other liquids. Water contact inside the battery may cause corrosion, resulting in spontaneous battery combustion and even an explosion. PDF p. 91
Do not use a smart battery that emits smoke, is bulged, leaks liquids, or has a damaged appearance. PDF p. 91
The liquid inside the smart battery is corrosive. If it leaks, please keep away from it. If it accidentally contacts your skin or eyes, rinse immediately with clean water for at least 15 minutes and seek medical attention. PDF p. 91
Do not disassemble, puncture, strike, crush, or burn a smart battery in any way. Otherwise, it may lead to battery combustion or even explosion. PDF p. 91
Do not short-circuit the positive and negative terminals of a smart battery. PDF p. 91
If the battery connector of a smart battery is dirty, use a dry cloth to clean it. Otherwise, it may cause poor contact, leading to energy loss or charging failure. PDF p. 91
Before replacing the smart battery of the aircraft, make sure that the battery connector, battery compartment interface, battery surface, and battery compartment surface are dry and free of water, and then insert the battery into the aircraft. PDF p. 91
When the smart battery is in a low temperature range below 10°C, the battery can be inserted into the aircraft to preheat it. When the battery is fully preheated before taking off, it is best to preheat it to above 20°C. PDF p. 91
In low-temperature environments, due to the limitation of smart battery output power, the aircraft's wind resistance will be reduced and its flight performance will be weakened. Please proceed with caution. PDF p. 91
When using the battery in a low-temperature environment, be sure to ensure that the smart battery is fully charged. The battery's discharge capacity will be reduced when operating in low temperature environments. Please insert the battery in the aircraft for pre-heating and when the battery is fully pre-heated before the aircraft takes off, it is recommended and great to pre-heat the battery to more than 20℃. PDF p. 91
5.3.1 Installing/Removing the smart battery
PDF p. 92| Step | Operation | Diagram |
| 1 | Turn off the smart battery before installing the battery. | |
| 2 | Slowly insert the smart battery into the battery compartment on the aircraft fuselage, and you will hear a clicking sound when the battery is in place. | 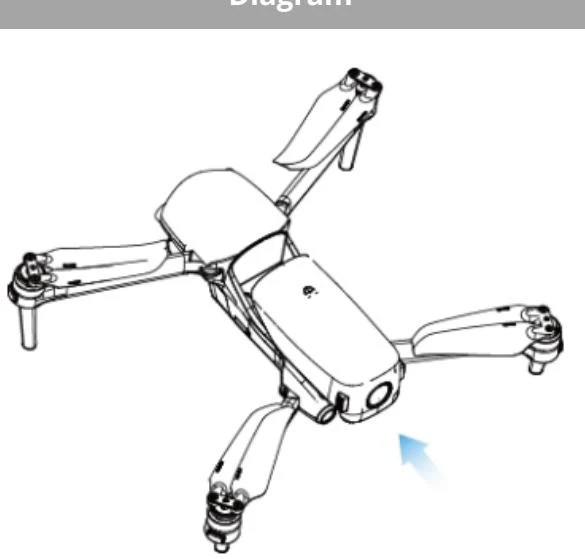 |
View the original table / diagram
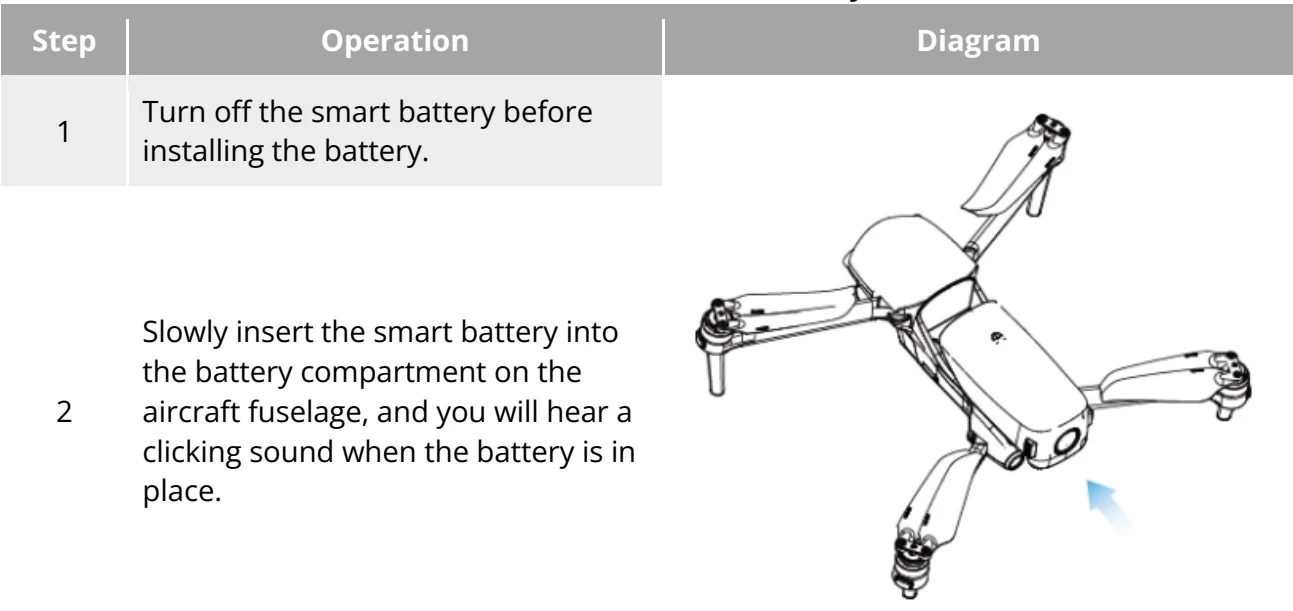
Before installing the smart battery on the aircraft, make sure that the battery is turned off. PDF p. 92
| Step | Operation | Diagram |
| 1 | Turn off the smart battery before removing the battery. | |
| 2 | Press and hold the unlock buttons on both sides of the smart battery and slowly pull out the battery. |
View the original table / diagram
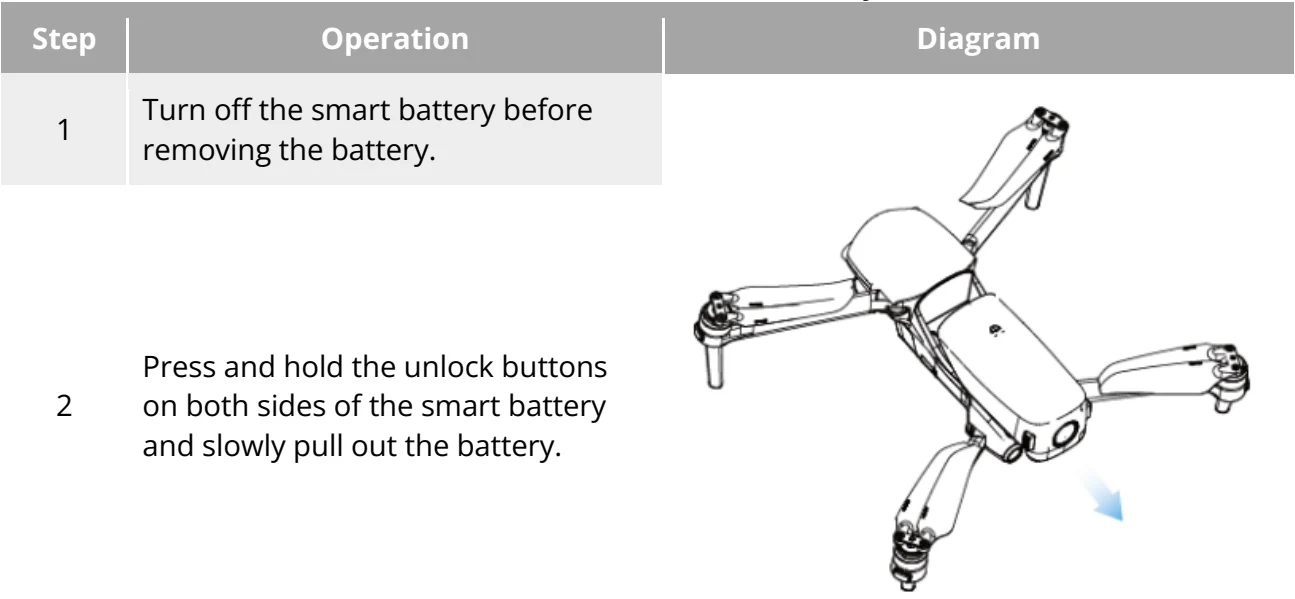
Important
PDF p. 93The unlock button of the smart batteries are consumable parts. Please do not press them hard to avoid any possible damage to the internal structure of the battery. PDF p. 93
5.3.2 Turning on/off the smart battery
PDF p. 93Turning on the smart battery
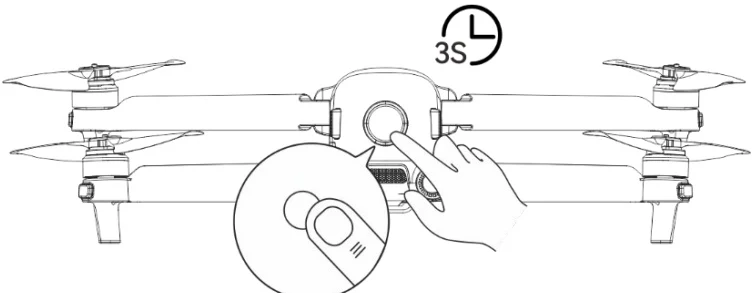
PDF p. 93When the smart battery is turned off, press and hold the power button for 3 seconds to turn on the battery. PDF p. 93
Turning off the smart battery
PDF p. 93When the smart battery is turned on, press and hold the power button for 3 seconds to turn off the battery. PDF p. 93
Important
PDF p. 93If the smart battery is not installed in the aircraft, it is not recommended to turn on/off the battery, and attention should be paid to insulation protection at the battery connector. PDF p. 93
Before removing the smart battery from the aircraft, turn off the battery. The LED1 and LED4 battery level indicators on the smart battery will blink 5 times to indicate that the aircraft is shutting down. Remove the smart battery from the aircraft after all battery level indicators are off. PDF p. 93
5.3.3 Checking the battery level
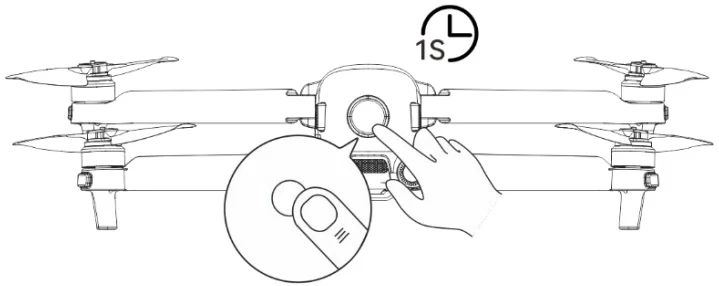
PDF p. 93When the smart battery is off, short press the battery power button for 1 second to check the current battery level through the battery level indicator status. PDF p. 93
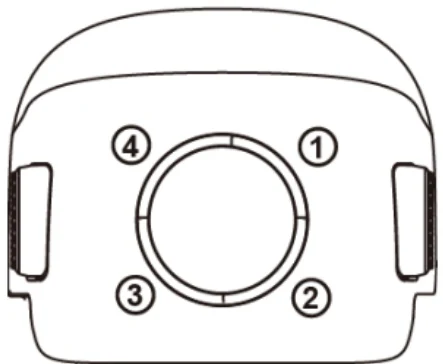
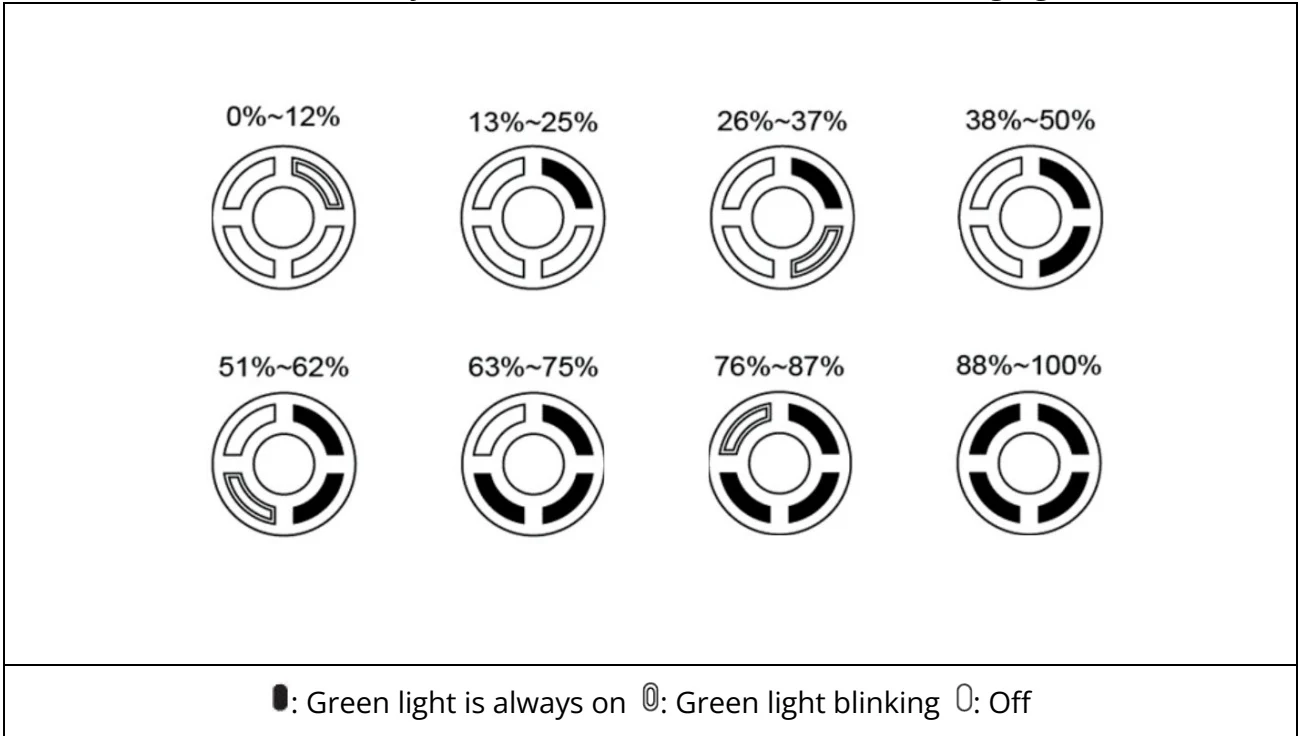
: Green light is always on : Green light blinking : Off PDF p. 94
Tips
PDF p. 94After the aircraft is connected to the RC, you can check the current smart battery level of the aircraft in the top status bar and “Aircraft Battery” interface of the flight application. For more information, please refer to “6.3 Status Notification Bar” and “6.5.5 Aircraft Battery” in Chapter 6. PDF p. 94
5.3.4 Charging the smart battery
PDF p. 94Connect the charging interface of the official battery charger to the notch of the metal electrode of the smart battery, and connect the plug to the AC power supply (100-240 V~ 50/60 Hz). PDF p. 94
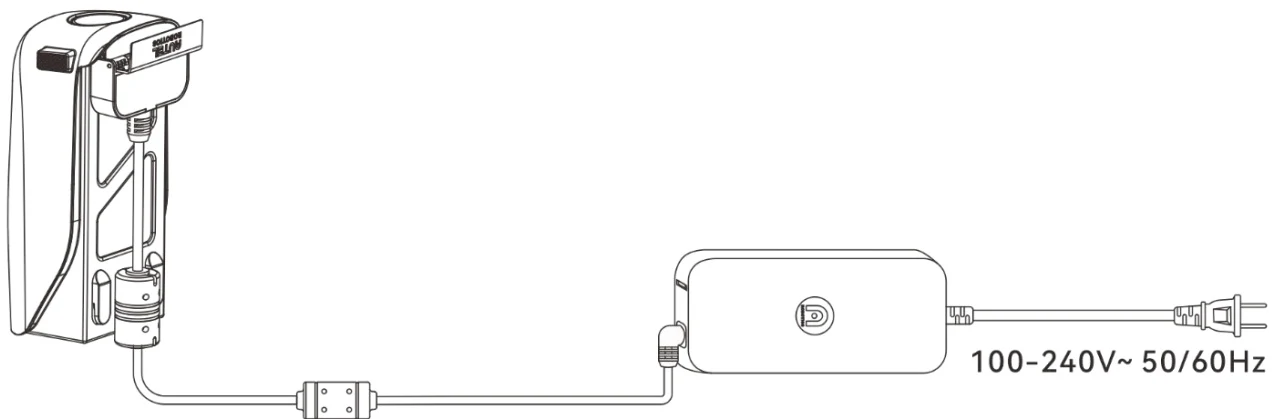
0%~25% PDF p. 95



76%~100% PDF p. 95

Warning
PDF p. 95Do not charge a battery that emits smoke, is bulged, leaks liquids, or has a damaged appearance. PDF p. 95
Do not use damaged charging devices to charge the smart battery. PDF p. 95
Modifying the official smart battery or charging device provided by Autel Robotics is prohibited. PDF p. 95
Only use the battery and charging device provided by Autel Robotics. Autel Robotics is not responsible for any consequences, such as battery accidents and flight failure, caused by the use of third-party batteries or charging devices. PDF p. 95
Keep the smart battery away from flammable and explosive items during charging. PDF p. 95
After the smart battery is fully charged, disconnect the connection between the charger and the smart battery and power supply promptly. PDF p. 95
After flight, it is recommended to wait until the smart battery naturally cools down to an appropriate temperature before charging the battery. If the temperature of the smart battery is higher than 4 5 ^ { \circ } \mathsf { C } , when the battery is connected to the charging device, the battery temperature protection function will be activated, and the battery cannot be charged until its temperature drops below 4 0 ^ { \circ } \mathsf { C } . PDF p. 95
Remarks
PDF p. 96It is recommended to fully charge the smart battery of the aircraft before the aircraft takes off. When the battery is fully charged, the battery level Indicator will turn off. PDF p. 96
Generally, it takes about 90 minutes to fully charge the smart battery of the aircraft, but the charging time is related to the remaining battery level. PDF p. 96
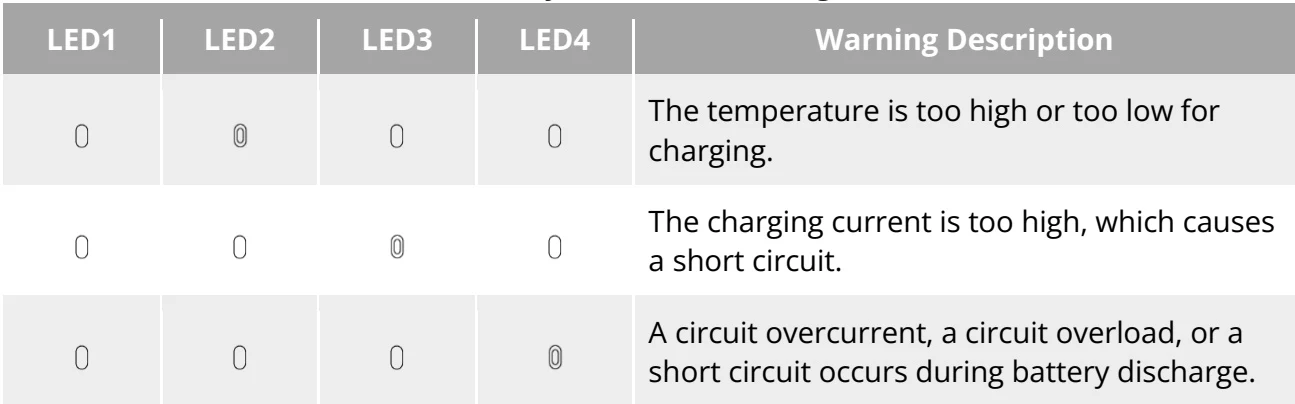
| LED1 | LED2 | LED3 | LED4 | Warning Description |
| 0 | 0 | 0 | 0 | The temperature is too high or too low for charging. |
| 0 | 0 | 0 | 0 | The charging current is too high, which causes a short circuit. |
| 0 | 0 | 0 | 0 | A circuit overcurrent, a circuit overload, or a short circuit occurs during battery discharge. |
View the original table / diagram